Motor arming
Props can cause serious injury! In this article I'll demonstrate a framework for creating safe motor arming systems without the need for switch checks at startup.
Definitions
The following terms are used in the text:
- Arming: an action which allows the motor to run.
- Disarming: an action which prevents the motor from running, and stops it if already running.
- Gesture: a user action which involves moving switches and/or sticks in a particular sequence.
The Sticky logical switch
The basis of the framework is the Sticky logical switch. Think of it as an on/off switch where the 'on' and 'off' actions can be customised. Here's the general idea for an arming switch:
L1: Type=Sticky V1={log switch for On} V2={log switch for Off}
L1 is the arming switch - it controls whether the motor can run. V1 and V2 are physical or logical switches representing the On (arming) and Off (disarming) gestures.
This method provides great flexibility since the arming and disarming gestures can tailored individually.
How to guarantee that the motor is disarmed at startup
By default, sticky switches are False at startup. However, if V1 is True at startup, then the sticky will see an On command and flip to True ('armed') immediately after startup. This will put the motor in an unsafe state.
To avoid this possibility, V1 should always represent a user action not a physical switch. That way, the motor is guaranteed safe until the user action is carried out. That way there is no need for startup switch checks.
Example 1: safe arming system
As an example, we'll design an arming system with the emphasis on safety. For this kind of system, (a) arming should be difficult and (b) disarming should be easy (but not so easy that you can do it accidentallly whilst flying the model).
We'll use the following gesture to arm the motor:- Throttle to idle
- Elevator stick back
- Pull SH
- Pull SH for 2 secs
The logical switches are shown in the Companion screenshot below.
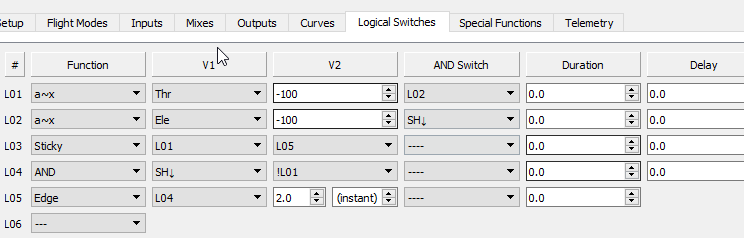
Logical switch scheme
How it works:
- L3 is the Sticky switch for controlling the motor. V1 is the arming gesture (L1), and V2 is the disarm gesture (L5).
- L1 is the arming gesture: throttle to idle + elevator fully back + pull SH.
- L5 is the disarm gesture:
- L5 goes True briefly, after L4 has been true for 2 seconds.
- L4 is true while SH is pulled, but not while arming ('!L1')
Note that 'Thr' and 'Ele' refer to sticks (not inputs). In the mixer menu, inputs are prefixed with 'I', sticks have no prefix.
Example 2: 'smart' arming switch
Many pilots like to use a simple 2-position switch for arming. The problem is that switch checks are necessary to ensure the switch starts in the disarmed position. However, by making it 'smart', we can do away with switch checks, by making it report 'Off' at startup, regardless of the actual position of the switch.
Here's the code, using switch SF.
SF↑ = Off and SF↓ is On.
L2: Edge SF↑ [0, infinite]
L3: Sticky (L2, SF↑)
The first line, L2, triggers an On pulse when SF transitions from Off to On. If SF starts in the On position, it will need to be moved Off then On in order to arm. Therefore, regardless of the position of SF, arming switch L3 will always be false at startup.
Using the arming switch to control the motor
With the arming logic done, we can apply it to the motor channel. Here's an example. CH7 is the motor channel, and it has two mixers:
CH7:Motor
Source=MAX Weight (−100%)
Source=Thr Weight (+100%) Switch (L3) Multiplex=REPLACE
How it works:
- The mix first line ('MAX') sets the motor to motor off. This is the default state.
- The second line ('Thr') passes control to the throttle stick when arming switch L3 is True. In the mixer menu, the 'multiplex' option must be set to 'Replace', so that it over-rides the first line.
Using Channel Override special function
Instead of the Replace line, one could use the Channel Override special function to disarm the motor. Channel Override bypasses all the mixers and outputs affecting a channel, so it might seem an easy method. However there are some drawbacks:
- It will not be possible to determine if the motor is running via a logical switch.
- It's more difficult to debug.
- There is some data duplication.
I don't recommend this approach.
Download
Arming/kill switch demo
Requirements
- For OpenTX 2.2 and above
Files
- MotorArmKill.otx (arming/kill switch operating on CH3)
Safety first!
- Remember to set the failsafe, so motor goes to idle on loss of signal
- Use the channel monitor to test operation before connecting up the motor
- Test, test and test again