
All about GVARs
Why use GVARs?
GVARs are a powerful feature of OpenTx. Used sensibly, they can simplify your setup, and make it easier to adjust in the field. In this article, I'll describe how to use them.
Differences between radios
Before we start, a quick note about the X-Lite and other similar small screen radios: these don't have a dedicated menu for global variables. Instead, GVARs are accessed via the Flight Mode menu. Each flight mode shows a list of GVARs designated G1 to G9.
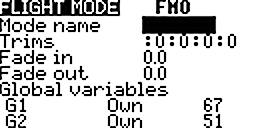
GVARs on X-Lite
GVAR basics
GVAR stands for 'global variable'. A GVAR represents a number. You can specify a GVAR in many contexts where a number is used, e.g.
- Weight, offset
- Diff, expo
You can also dynamically alter a GVAR, and it will retain its value even after you switch off the transmitter. (In this and other respects, its similar to digital trims.)
One source of confusion is the term 'global'. In fact, GVARs are not truly global - they apply only to the active model (not to be confused with global functions which apply across all models).
Setting and referencing GVARs
In this section we'll examine how to
- Set a GVAR's value
- Use a GVAR
Setting a GVAR
OpenTx provides nine GVARS, named 'GV1', 'GV2'... 'GV9. They are managed in the GLOBAL VARS menu, where you can view and alter their values.

GVARs menu (first 7 shown)
Each GVAR has nine columns labeled FM0, FM1, ... FM8, representing the nine flight modes.
You can enter a different number for each flight mode. When a GVAR is referenced, OpenTx retrieves the value for the flight mode which is active. For example in the screenshot above: if FM1 is active, then GV1 returns '20'. If FM2 is active, GV1 returns '40'. And so on.
Remember that FM0 is the default flight mode: if you don't define any flight modes explicitly, then FM0 is always active.
Using a GVAR's value
In this section we'll see how to use a previously assigned GVAR. As an example we'll reference a GVAR in the weight field in a mixer.
- In the mixer list, highlight a mix line
- Open the mixer editor
- Highlight the weight field
- Press [ENTER long]
- The display changes from a number to 'GV1'. You can choose another GVAR using the +/- keys. You can also select the negated value by selecting the corresponding '-' entry.
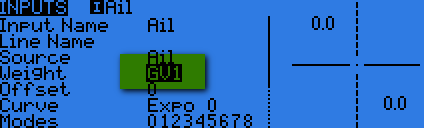
Long press to display GVAR
Simple glider example
OK, so that's the theory... let's see how GVARs are used in practice. As an example, create a simple glider setup, with channels 5 and 6 assigned to ailerons:
CH5:left ail
Src=Ail
CH6:right ail
Src=Ail
Setting diff the old way
Now add some differential for each aileron servo.
To set differential: open the mixer editor, and to skip to the curve field. Specify 'diff' as the curve type, and enter a value. The diff value may be entered directly, or it may reference a GVAR.
First, let's specify diff by typing the value in directly:
CH5:left ail
Src=Ail, Diff = 30
CH6:right ail
Src=Ail, Diff = -30
There's one problem with this: In order to alter diff, we have to make two identical data entry operations, which is both tiresome and error prone. Let's see how to improve it!
Setting diff via a GVAR
Instead of specifying the value of diff directly, let's store the diff value in a GVAR and then reference it in the diff field.
- Go to the GVARs menu
- In the 'GV1' line, go to the FM0 column, and enter '30'.
- In the Mixers menu, set diff = GV1 and -GV1 for the two aileron channels.
GVAR
GV1=30 -- stores diff value
CH1:left ail
Src=Ail, diff = GV1
CH2:right ail
Src=Ail, diff = -GV1
To change diff in both mixes, only one adjustment is required, to GV1.
Making diff flight mode specific
So far we've only used the default flight mode (FM0). Suppose our setup uses several flight modes.
We saw earlier that a single GVAR can provide different values for different flight modes - so we simply assign the required diff values to the appropriate flight modes in the GVAR menu.
GVAR
GV1=30(FM0), 45 (FM1)-- stores diff value for FM0 and FM1
CH1:left ail
Src=Ail, diff = GV1
CH2:right ail
Src=Ail, diff = -GV1
Compare this with the solution without using GVAR's:
CH5:left ail
Src=Ail, Diff = 30 Flightmode = FM0
Src=Ail, Diff = 45 Flightmode = FM1
CH6:right ail
Src=Ail Diff = -30 Flightmode = FM0
Src=Ail Diff = -45 Flightmode = FM1
The benefits of GVARs should be clear!
Setting a GVAR dynamically via a Special Function
So far we've set our GVARs by typing in the value directly in the GVARs menu. However, OpenTx provides an alternative and very powerful mechanism for setting GVARs, using the 'Adjust GVAR' action in special functions. This opens up exciting possibilities for varying expo, diff etc. dynamically.
'Adjust GVAR' action
The Adjust GVAR action provides a way of altering the value of a GVAR in response to some event. Let's see how it works:
- Open the Special Functions menu, and find an empty slot
- Select 'Adjust GVAR' from the list of actions
- Choose the type of action:
VALUE: Sets GVAR to a number
SRC: Sets GVAR to the value of a channel, switch or input
GVAR: Sets GVAR to value of another GVAR (copy GVAR)
INC: Add or subtract 1 from GVAR - Finally, specify a switch (physical or logical) to trigger the action
The action is executed the moment that the switch in step 4 becomes true.
You can also specify 'ON' as the switch, in which case the special function is always active - this effectively binds the GVAR to the source. We'll see why this is useful in the next section.
Binding a GVAR to its source
Sometimes it's useful for a GVAR to track the value of something, in other words to be 'bound' to a source. For example, you may wish to a GVAR to track the value of a channel output.
To implement binding,
- Create a special function
- Choose the "Adjust GVAR" action
- In the src field, set the source to the channel you want to track
- In the switch field, select "ON"
In the screenshot below, GV1 is bound to CH8. In other words, GV1 will always report the value of CH8.
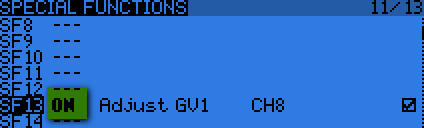
Binding GV1 to CH8
Adjusting diff or expo dynamically
Say we want to vary aileron differential in flight, depending on the position of the rudder trim (TrmR). We can do this by binding GV1 to the rudder trim, then setting Diff = GV1.
The code is in three parts:
- CH8 generates the diff value, based on the position of the rudder trim. Weight and offset are chosen so that diff is in the range of 20% - 60%.
- Special function SF1 binds GV1 to CH8. In other words, GV1 = Diff.
- Finally, GV1 is used as the diff value.
CH8:Diff value
Src=TrmR wt=20 offset=40
SF1
switch="ON" Action="Adjust GV1" Parameters="Src=CH8"
CH1:aileron
Src=Ail, Diff=GV1
Summary: benefits and drawbacks of GVARs
The benefits of GVARs are as follows
- Saves entering the same value multiple times
- Allows dynamic adjustment of diff, expo etc.
- Flight mode aware
- User friendly menu for adjustment
The drawbacks
- Only 9 available
Using GVARs with cascading mixers
GVARs can be used in conjunction with cascading mixers to create powerful and elegant solutions.