Tutorials : Servomix/Multimix on the mc4000
Created Jan 2002
Revised Dec 2002, April 2003, Dec 2005, Feb 2006
Introduction
There is no better illustration of the flexibility of the mc4000 than the setup for an F3F slope racing glider. For those not familiar with F3F models, these models employ four wing servos, and have some of the most complex mixing of any R/C model.
One of the most crucial mixers is elevator-to-flap mixing ("snapflap"). With this mix, all four wing control surfaces droop slightly (i.e. camber is increased), as up elevator is applied.
Whereas other radios have only an inflexible snapflap facility (if any), the 4000 is totally flexible. You can have positive snapflap (for racing), or positive/negative snapflap (for aerobatics). With a little creativity, you can switch between different curves according to flight mode, or disable snapflap entirely. Whatever you want, you can do, period!
This case study shows how to implement snapflap, using two approaches. The first uses a built-in mixer, while and the other using multimix. The multimix approach involves a little more work to program, and an understanding of cascading mixers. However, it is very easy to adjust in the field, and also easy to add a very useful in-flight volume control. This is great for making adjustments without landing each time.
Snapflap Response Curve
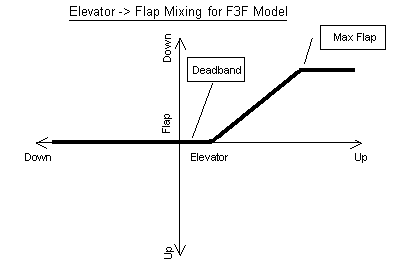
Before we start programming, let's look at a typical response curve for our snapflap for F3F racing. The X-axis represents elevator stick displacement, the Y-axis is the amount of camber.

Note the characteristics of this curve:
- Moving the elevator stick forward has no effect on flap movement.
- Moving the elevator stick in a deadband area around neutral also has no effect on flap.
- As up-elevator is applied beyond the deadband area, flap deflection is increased from zero to a maximum (around 3mm in practice).
To implement this response, we would need to at least 4 points to define the curve, and even more to get a continuous smooth curve.
We'll now investigate a couple of possible implementations, paying particular attention to (a) ease of programming, and (b) ease of adjustment.
Solution 1: using BUTTERFLY mixer
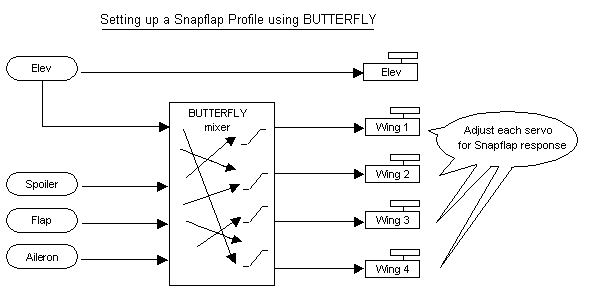
This method uses a the built-in BUTTERFLY mixer. It uses the stock Butterfly mixer and is easy to program, but has some drawbacks.

To set up the S response curve, it is necessary to adjust the elevator curve for each wing servo separately. This has a number of disadvantages. First, the more points on the S curve, the more adjustments. To implement the S response for our snapflap, typically you'd need a curve with all 13 points, this would mean 4x13=52 separate adjustments for snapflap alone; This would be far too tedious, but more importantly, it would be virtually impossible get identical responses from all the servos.
Let's look at a better solution.
Solution 2: using Multimix and Servomix
This solution uses (a) a custom servomix, and (b) a multimix to define a single 13-point curve for the snapflap response, feeding into the servomix.
It is more complex to program, but much easier to set up and adjust.
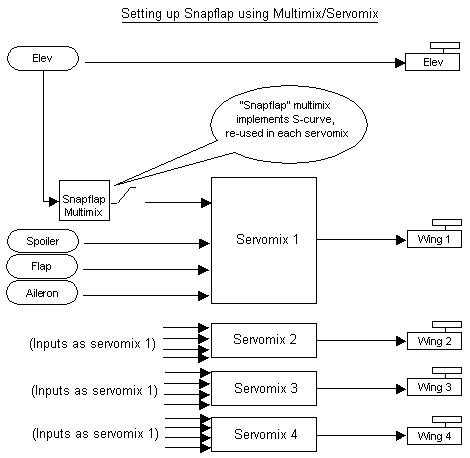
Here's the schematic:

The Snapflap multimix has a single input of elevator. The output is the required 13-point S response for snapflap.
The servomix has our Snapflap (multmix) input in addition to spoiler, aileron and flap. Since the 13-point snapflap curves are already defined in the multimix, a simple 3-point curve can be used for the multimix input of each servomix.
To adjust the snapflap volume in flight, simply assign an analogue switch to the Multimix. In effect we've created our own re-usable snapflap mix, and fitted it with a volume control!
Note that if you wanted different shape snapflap curves for the inner and outboard pair of surfaces, you would need to set up two multimixes, one for each pair.
Servomix and Multimix setup procedure
The procedure for programming a multimix is not described very well in the manual, so let's see how it's done.
For the first servo ONLY
- In the Assign Servos screen, assign the servo to a Servomix .
- In the Assign Mixers screen, select the servo, and rename servomix to a memorable name e.g. Ail-left
- Assign the following inputs to the Servomix: 1=Aileron, 2=Flap, 3=Spoiler, and 4=MultimixNN (NN is a system generated number).
The multimix has now been reserved, but its inputs have not yet been specified. To do this, stay in the Assign Mixers screen and
- Select the MixNN mixer (at the end of the list of servos).
- Rename it to say 'snapflap'
- Set a single input = elevator
The Snapflap multimix has now been set up. For each of the three remaining servos:
- In the Assign Servos screen, assign the servo to a Servomix.
- In the Assign Mixers screen, select the servo, and rename the mix to a memorable name e.g. Ail-right
- Assign the following inputs to the Servomix: 1=Aileron, 2=Flap, 3=Spoiler, and 4=Snapflap.
Strategy for setting up curves, and volumes
One source of confusion to many mc4000 users is which curves to adjust. The confusion arises because of the hierarchy of servos, mixers and controls, each of which can be adjusted and each of which has a subtlely different effect.
A good approach is to first initialise curves and movements to 100%. this will need to be done in the servo, mixer, and control screens. Also set zero differential. This maximises the movements, and provides a solid basis for adjustment.
Here's a systematic and proven approach to adjusting the servo responses. The basic idea is to work back from the servo end, through the mixers, and to the controls, as follows:
- Set the servo travels so that corresponding servos match all the way along their travel . You may need 5 or 7 point curves for large deflectors like flaps. Also adjust the end points and limits so that they just avoid hitting the end stops with control sticks at max.
- Next, adjust the mixer curves to get the relative mixes right.
- Finally, adjust the control travels. If you have multiple flight modes, then this last step can be repeated for each flightmode.
When adjusting mixer curves , it's can also be very useful to switch off all the mixers except the one being adjusted.