Volz Wing-Star/Wing-Maxx:
Instructions & Schematic
Michael Volz kindly
sent the Wing Maxx instructions for inclusion in
"R/C Soaring". I know that some servos
sold in the UK have been supplied without instructions,
if this rings a bell then just hit the Print button now!!
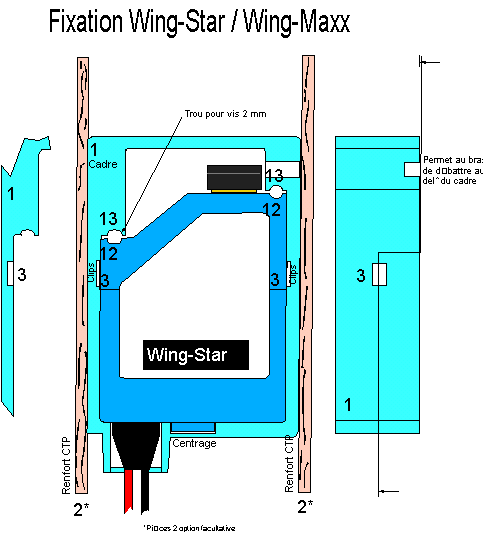
NOTE Some of the
numbers don't appear to tie up with the schematic, but it
shouldn't be too hard to work it all out.
When you put the servo (4)
vertically into the frame (1) the two ridges (5,6) on
both sides of the servo snap into corressponding frame
slots and locked in place. If you want to get the servo
out of the frame use a knife or screwdriver for going
inbetween frame and servo.
Widen the frame a lttle bit and the
servo pops out. (Those ridges can be sanded off if you
would prefer not to use the snap system, that would allow
the servo to be slid and out, and retained with either
the following screw method or by taping over the servo
and frame.)
In addition to the snap in parts
you have two half-round shapes on top-sides of the
servocase (7,8) and their counterparts within the frame
(9, 10). When the servo has been put into the frame both
parts build a hole (11, 12) in which to screw in the 2 mm
screws supplied with the servo for securing the servo.
(This system can be used with or without the snap-in
feature.)
When the frame made of glass
reinforced material has been sanded and will be fixed
with epoxy in a sheeted foam wing we recommend to instal
the supplied plywood strips on both sides of the frame
(see photo in our servobrochure!). That way you reinforce
the recess, adding substantial strength.
If the plywood strips have been
installed on both sides of the frame it is hard to widen
the frame. In that case and if mounting in a hollow wing
you may not want to use the snap in feature.
Then, as mentioned above, just cut
off or sand off the two ridges (5, 6) on both sides of
the case.
Having removed these ridges the
servo easily slips into the frame and can to be secured
with the two 2 mm-screws supplied (or taped). Two screw
holes are created once the servo is seated in the
mounting frame (11, 12). In addition, there is a ridge on
the bottom of the frame that seats into a recess on the
servo's bottom case, holding the servo at the proper
position in the frame.
The vacuum formed cover is cut into
two pieces, producing two aerodynamically shaped pieces
that cover and protect the servo, servoarm and pushrod.
Fix the cover with transparent tape along its outer edges
- doublesided tape is not recommended as it can be
extremely difficult to get the cover off, and can cause
you to damage your wings skin material.
|